Registration Front
The front application is a React 18 application. On this page, we will explain the architecture behind it, and at the end the registration page. The code is written in Javascript instead of Typescript so as many developers can understand it. Also, some will use a different framework.
Repository
https://github.com/Mehdi-HAFID/nidam-spa
Requirements
Nidam uses Material UI 5, React Router 6, Redux Toolkit 2, and Redux Saga. You're supposed to understand these so the code makes sense. Otherwise,
you can just write your own frontend from scratch. The backend is a REST application so as long you use the right endpoint with a valid object you're
good to go. However, Nidam is made to offer a production level of every component in the OAuth 2 system from start to finish.
Which means fully working frontend application. And this page will explain the architecture of the frontend, from a registration point for now.
We will come to explain the other parts, like login, logout, and access private routes, on the next pages. For now, we will focus on registration.
Store
Store Definition
Store definition with Reducer and Saga for Registration.
import {configureStore} from '@reduxjs/toolkit';
import createSagaMiddleware from 'redux-saga';

import registerReducer from "./register/registerSlice";
import {watchRegistration} from "./rootSaga";

const sagaMiddleware = createSagaMiddleware();
const middleware = [sagaMiddleware]

export const store = configureStore({
	reducer: {
		register: registerReducer
	},
	middleware: (getDefaultMiddleware) =>
		getDefaultMiddleware().concat(middleware),
});

sagaMiddleware.run(watchRegistration);
Again, if you don't understand what is this code, you need to check Redux Toolkit, Redux Saga, and other relevant libraries. Nidam Docs will not teach you about any of the components Nidam uses. It will only explain itself.
Reducer
Register Reducer holds data that pertains to registration and generates Action Creators.
import { createSlice } from '@reduxjs/toolkit';

const initialState = {
	registrationLoading : false,
	registrationError : null,
	registeredUser : null,
	secret: null
}

export const registerSlice = createSlice({
	name: 'register',
	initialState,
	reducers: {
		registerStart: (state, action) => {
			state.registrationLoading = true;
			state.registrationError = null
		},
		registerSuccess: (state, action) => {
			state.registrationLoading = false;
			state.registrationError = null;
			state.registeredUser = action.payload.user;
		},
		registerFail: (state, action) => {
			state.registrationLoading = false;
			state.registrationError = action.payload.error;
			state.registeredUser = null;
		},
		registerResetError: (state) => {
			state.registrationError = null;
		}
	},
})

export const { registerStart, registerSuccess, registerFail, registerResetError,  } = registerSlice.actions

export default registerSlice.reducer;
Backend Call Pattern
Nidam Front uses a pattern that you will see gets repeated with any backend call:
- Calling the Saga will get to this in a later section.
- Once the Saga is executing, first we call the SomeActionStart, which sets a loading flag of SomeAction to true and resets the error message to null.
- If the call is successful, SomeActionSuccess is called, which saves the response data in the corresponding reducer properties, and sets loading to false.
- If the call is unsuccessful, SomeActionFail is called, which sets the proper error message from: server, custom message, or request. Sets loading to false. And the corresponding reducer properties to null.
Saga: Calling the backend
Root Saga
This associate Saga functions -generator functions- with their Action Types.
import {takeEvery} from "redux-saga/effects";

import * as registerTypes from "./register/saga/registerSagaActionTypes";
import {registerReCaptcha} from "./register/saga/registerSaga";

export function* watchRegistration() {
	yield takeEvery(registerTypes.REGISTER, registerReCaptcha);
}
Registration Saga Action Type
These are the actions that will be used to launch a Saga.
export const REGISTER = 'REGISTER';
The component that will call a Saga ( instead of creating an object with the type field, will get to this in the next sections), we create a function
for each Action Type that takes the parameters that will be passed to the Saga. Which makes the code cleaner.
import * as actionsTypes from "./registerSagaActionTypes";

export const register = (user) => {
	return {
		type: actionsTypes.REGISTER,
		user: user
	}
};
Saga function
This is where we call the backend endpoint. in this case /registerCaptcha endpoint discussed on the previous page which supports Google ReCaptcha
in here, you see the pattern discussed earlier.
export function* registerReCaptcha(action) {
	yield put(registerStart());
	try {
		const response = yield registerAxios.post("registerCaptcha", action.user);
		yield put(registerSuccess({user: response.data}));
	} catch (error) {
		yield * catchError(error, registerFail, 'Error Registering, Try Again');
	}
}
The registration endpoint takes an object with 3 parameters: email, password, and recaptcha key. which is action.user as defined in the previous section
registerSagaActions.js. The ReCaptcha key property will be explained in the Recaptcha section later.
The catchError() function handles the 3 ways an error can be produced that are repeated for every Saga.
That's why they're extracted in a generic Generator function.
3 parameters must be supplied to catchError: error object, reducerAction, and custom error message.
import {put} from "redux-saga/effects";

function* catchError(error, failAction, requestError) {
	if (error.response) {
		console.log(error.response.data.message);
		yield put(failAction({error: error.response.data.message}));
	} else if (error.request) {
		console.log(error.request)
		yield put(failAction({error: requestError}));
	} else {
		console.log('Error', error.message);
		yield put(failAction({error: error.message}));
	}
}

export {catchError};
Now we have our store ready to be used by Components.
Register Page
Now we get to collecting the email and password.
Email
Nidam uses a certain pattern of saving and validating a text input field. So what will be explained here also applies to the password field.
Email Field State
A React state hook is used to hold all information that pertains to a field. let's take a look at the email object and then explain:
	const [email, setEmail] = useState({
		value: "",
		validation: {
			required: true,
			maxLength: 320,
			isEmail: true
		},
		valid: true,
		validationMessage: null
	});
valueholds the current value of the input.validationobject holds all validation rules. Rules will be explained later.validandvalidMessageholds the result of the validation process. If the input passes all rules then valid istrueand message isnull. Otherwise, valid isfalseand the message describes which rule the current value fails to pass.
We use Material UI 5, this is the input text field:
<TextField
	margin="normal" required fullWidth id="email" autoFocus
	label="Email Address"
	name="email" autoComplete="email"
	value={email.value}
	onChange={emailChangeHandler}
	helperText={!email.valid ? email.validationMessage : ""}
	error={!email.valid}
/>
value refers to the state described earlier: email.value.
Validation
emailChangeHandler() is called with every input change (you can change this behavior to blur for example). It validates the new input and updates
the email state object accordingly.
const emailChangeHandler = (event) => {
	const updatedEmail = changeText(email, event.target.value, "Email");
	setEmail(updatedEmail);
}
changeText() is a generic validation function to be used by all change handler functions. It takes the field state object, the new value of the text,
and a label for validation message purposes.
const changeText = (inputTextState, value, label) => {
	const updatedInputTextState = {...inputTextState};
	updatedInputTextState.value = value;
	const [valid, message] = checkValidity(updatedInputTextState, label);
	updatedInputTextState.valid = valid;
	updatedInputTextState.validationMessage = message;
	return updatedInputTextState;
}
changeText() validate the new value by calling checkValidity(). This function validates the value against the rules set in email.validation object.
I will not describe the whole rules, only the validation.required = true rule. And the same applies to all other rules:
export const checkValidity = (element, name) => {
	const rules = element.validation;
	let value = element.value;
	let isValid = true;
	let validationMessage = null;

	if (!rules) {
		return true;
	}

	if (rules.required) {
		value = typeof value === 'string' ? value.trim(): value;
		isValid = value !== '' && isValid;
		validationMessage = !isValid ? `${name} is required!` : null;
		if(!isValid){
			return [isValid, validationMessage];
		}
	}
	// other rules...
	return [isValid, validationMessage];
};
If the validation object contains required rule and is set to true: it trims the value. Then it checks if it contains any character.
If the validation of this rule is successful, then we continue to check the next rules. If validation fails it returns an array with two values
[false, validationMessage].
changeText() returns the updated email state object with the new value and the validation fields set appropriately.
emailChangeHandler() sets the returned object as the new email state field.
Password
Password and confirm password fields are the same as email with logic for match validity.
Google Recaptcha
Load
Nidam comes with Google Recaptcha v3 enabled by default. First, we load recaptcha/api.js for the component that will be using it.
useEffect(() => {
		document.title = "Sign up - Nidam By Mehdi Hafid";
		// ReCaptcha
		const script = document.createElement('script');
		script.src = 'https://www.google.com/recaptcha/api.js?render=6LcyyEMpAAAAAMztnW6xVq1HFD0b-mlyk2t6NZa-';
		script.class = "external-script"
		script.async = true;
		script.defer = true;
		document.body.appendChild(script);
		return () => {
			document.body.removeChild(script);
		};
	}, []);
You should replace the reCAPTCHA_site_key specified above with your own.
Execute
We want to execute the captcha when the user hits the Sign Up button. The button declaration:
<Button fullWidth variant="contained" sx={{mt: 3, mb: 2}}
		onClick={executeReCaptcha} disabled={registrationLoading}>
	Sign Up
</Button>
executeReCaptcha() declaration:
const executeReCaptcha = (e) => {
		e.preventDefault();
		window.grecaptcha.ready(function() {
			window.grecaptcha.execute('6LcyyEMpAAAAAMztnW6xVq1HFD0b-mlyk2t6NZa-', {action: 'submit'})
				.then(token => register(token))
		});
	}
First, we call the ReCaptcha backend to get a token that we will next send to our backend to check if we would allow the request. After getting the token then we execute our logic for registering the user.
Register
Declaration
import {useDispatch} from "react-redux";
import * as registerSagas from "../redux/register/saga";

const SignUp = (props) => {

	const register = token => {
		setTouchedPassword(true);
		setShowTermsError(!termsAccepted)

		if (!checkAllInputsValidity()) {
			return;
		}
		const user = {
			email: email.value,
			password: password.value,
			recaptchaKey: token
		}
		dispatch(registerSagas.register(user));
	}
}
checkAllInputsValidity() is like a collection of each input change handler. It validates all inputs and if all are valid we call our saga defined earlier
passing the user object with the email, the password, and the captcha token.
Code Optimization
SignUp.js is around 400 lines. That's because I prioritize OAuth 2 code and features over optimizing frontend code. So until certain OAuth features are implemented I will not pay attention that much to the frontend code.
Let's Create a user with the front
If the registration backend is stopped after you follow the instructions described in the first time run.
Then before you start the backend make sure to comment again the lines in both application.properties
and nidam/registration/RegistrationApplication.java. Because those lines are meant only for the first time you run the backend.
And then run the frontend using: npm start

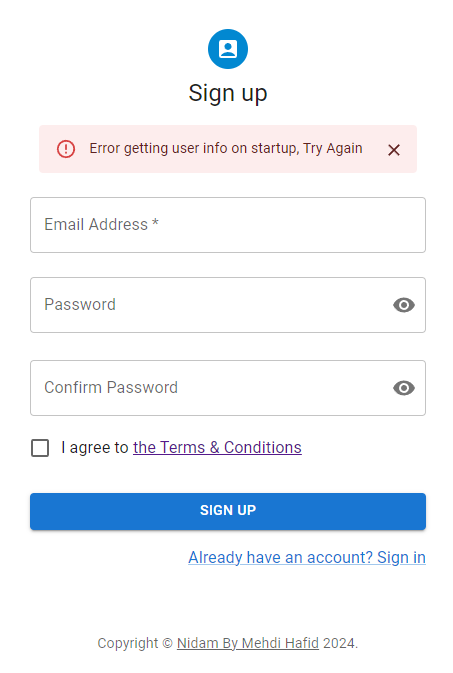
Ignore the error at the top, at this stage we only describe the registration process. The error is related to the resource server which is not running.
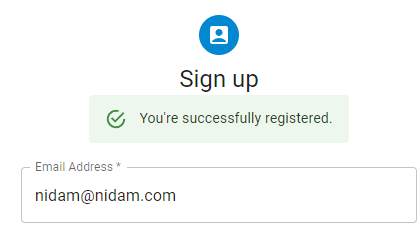
Enter a valid email and password. Confirm the password and agree to the terms. For example, email:nidam@nidam.com and password: MyPassword

Now you have created a user using the frontend with ReCaptcha validation.
